Saturday, March 16, 2013

Southwest Teaser...

I'm back from an awesome week in the Southwest -- Death Valley and Grand Canyon, to be specific. It was a spring break field trip for the Earth Science Department at Syracuse University, and it was a much needed (for me) chance to spend time in the sunshine, under the big skies, at outcrops


I have lots to blog about; not only the places we visited, but also the process of creating a field guide before the trip, and the benefits of using an iPad at outcrops. I'll try my best to squeeze in some blog entries over the next couple of months: a week in the field has jump-started my motivation and the next couple of months are going to be very busy, finishing off papers, getting ready for a conference, and getting ready for six weeks of field work (plus finishing off what I really hope is my last semester of classes ever).

In the meantime, here are a few teaser photos of what is to come:

Mesquite Sand Dunes, Death Valley

Grand Canyon Sunset

Amargosa Chaos, Death Valley


Thursday, February 21, 2013

Belemnite Battlefield

As a grad student, time management often feels like being on a battlefield, especially in the first year when you have to balance course work with research and other responsibilities (I'm rather fortunate that this is a fellowship year for me, so I don't have to add teaching duties on top of everything else).

Last month, as I was searching through photos from some field work I did in west-central Alberta in 2010, I found a photo of a different sort of battlefield. I shared it on twitter, and it was retweeted a few times - enough to motivate me to do a more detailed blog post about it.

The photo is of a boulder from the Rock Creek/Highwood Member of the Jurassic Fernie Formation. It's not in situ, but I've been told that there are in situ outcrops in the same area. The boulder is full of belemnites, or rather belemnite guards.

Belemnites are the state fossil of Delaware. They are an extinct cephalopod (closest modern species are squid) that were found in Jurassic and Cretaceous oceans (although there is some evidence that they originated in the Triassic). The guards were part of the internal structure and it is believed they were used for propulsion and balance in the water, perhaps similar to how a submarine's ballasts work.

Belemnites can be used for dating Jurassic and Creatceous strata, but they are also an important environmental indicator - they lived in warm (relatively) shallow seas.

The term "belemnite battlefield" is used to describe a high concentration of belemnites. These accumulations could be related to mass-deaths, although not necessarily battles. They could be lag deposits, coarse material left behind after the fine sediment they were deposited in was washed away.

I'm not sure where the term "belemnite battlefield" originated but I like it and I made sure to fit it into my MSc thesis.

"Belemnite Battlefield"

Monday, February 11, 2013

Presenting your work

The photo that is currently the header in this blog is a cropped version of this one:


These rocks are Nordegg Member limestones and sandstones; part of the Jurassic Fernie Formation in west-central Alberta. Although I used mainly subsurface data for my MSc, I did spend a couple of days in the field looking at outcrop equivalents to the units I was studying. I can't say enough about how important this was for me to really be able to visualize relationships, both spatially and temporally.

I took this photo about a year into my MSc, and once I had it I started using it for presentations because I like it and it is relevant.

Every PowerPoint presentation I put together on my research has the same design. I didn't use the photo on posters, but I did use the same colours (the school colours) for outlining sections of my posters as I used for separators/outlines on my slides.

This photo is on the title slides, and a cropped version similar to the blog header is along the bottom of each slide.  I use a "footer" on the bottom of PowerPoint slides because unless you are in an auditorium that slopes to the front, very few people will be able to see any content in that space.

I use the logos for my university and my research group on all of my slides. On a white background, the logos are in full colour, but on a coloured background, the logos are a single colour. Besides the fact that it looks better, some universities have rules about using their logos, and for my MSc school, this was one of them.
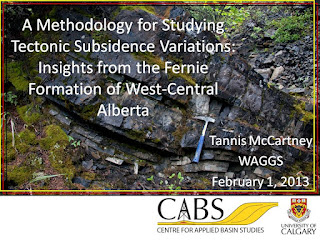
Sample title slide for my MSc research
Sample text slide for my MSc research.
This is the most text I would ever put on a single slide.

For the content, I use a white background with black text in the default font. The simpler, the better. The example I have here is a text slide, but it is one of very few that I put into my presentations. I try to minimize the text on the slides. Instead, I have arrows and circles to remind me what points I want to make about each slide. When I do have text, such as in the slide above, I make each bullet point appear (using the simplest animation possible) as I discuss it, so that the audience and I are going through the material at the same pace.

I try to keep my slides as simple as possible. I try only put content in the frame I've created with the slide design (i.e. no covering my beloved outcrop photo). Unless I'm directly comparing something on two different figures, I don't put figures on top of each other with animations. A new figure gets a new slide. If I do use animations, it is to make the annotations appear in the order I want to talk about them.

I never flip back through my slides during a presentation. It's too easy to get lost (for the presenter and the audience). If I want to show something again for emphasis, I make a duplicate of the slide and place the copy where I want to show it the second time. This also makes it easier to estimate the time I'll need based on the number of slides I have.

One of the exciting things (for me) about starting new research is getting to pick new designs for presenting my work. I don't have field photos yet so I'm using maps and a scrap of unmarked seismic. I suspect I may end up with more than one design for my current research, because it is a bit broader than my MSc research was. The challenge fun part will be finding a way to tie the designs together in a cohesive way.

Monday, February 4, 2013

Prehistoric photos

The Calgary Zoo has a section called the "Prehistoric Park," with a path through a recreation of what the environment might have been like when dinosaurs roamed Alberta. Walking through here is a peaceful break from the rest of the zoo-my nephew had a wee nap in his stroller when we walked through here with him in June 2012.


Friday, January 25, 2013

Another gap in the record

Here's another photo of an unconformity you can put your finger on. This one is from the front ranges of the Canadian Rockies. It is a contact between Cambrian and Devonian sediments. On the left, the light grey/buff rocks are Cambrian. This unit is brecciated and trilobite fragments have been found in it. On the right are Devonian rocks. This unit contains stromatoporoids.


Thursday, January 24, 2013

Geology photo: A gap in the record

I took this photo on a GSA pre-meeting field trip in 2010. This is near Red Rocks Amphitheater in Colorado. On the left are the Pennsylvanian-aged red rocks of the Fountain Formation. On the right is Precambrian gneiss. The gap in between represents 1.4 billion years. Cool!


Wednesday, January 23, 2013

On the shoulders of giants

I worked as a research assistant for about six weeks before I moved to Syracuse to start my PhD.  I  worked on a couple of projects, both of which really reinforced that as scientists, our work really is on the shoulders of giants. For those of you who haven't heard this phrase before, it means that our research builds on what has been done by others before us.

One of my projects involved going through old air photos and field books (from the 70s) and comparing what was noted there with the database of existing samples (that information has been transferred into ArcGIS where I'm using it in conjunction with landsat)--figuring out what we have so it can be used to plan future field expeditions to the same regions and so that samples can be pulled for further analysis.

While everyone knows that their field notes need to make sense to themselves days, weeks, or months after returning from the field, we don't always realize that our field notes may be used by someone else forty years later.

I've compiled a list of tips and tricks for making your field notes useful to someone other than yourself, based on what I saw at work:
  • Plain (lined or unlined) paper is easier to read than pre-printed templates that look like forms.
  • Put locations (i.e. lat/long or utm) in the field books for every station you stop at, even if you don't collect a sample there. If someone else in your field party is collecting notes at that location, make a note of it in your field book.
  • If you're marking up air photos or maps and using the same ones for more than one field season/party, colour code them (and include a legend and/or labels). 
  • Be consistent in how you record/label things, and include a key or legend. Review these methods before going into the field each time. Everything recorded in the same field book should use consistent methodologies. These same methods should transfer to maps, air photos etc.
  • Don't repeat sample numbers in the same area. There's nothing worse than coming across an air photo with two station 22's marked on it (they were from two different years, but the years weren't marked on the air photo).
  • Speaking of sample and station numbers, use leading zeros (i.e. 001, 002, 010). It makes it much easier to sort the information once it is transferred to a spreadsheet or database
For some examples of real field notes, check out Accretionary Wedge #47